|
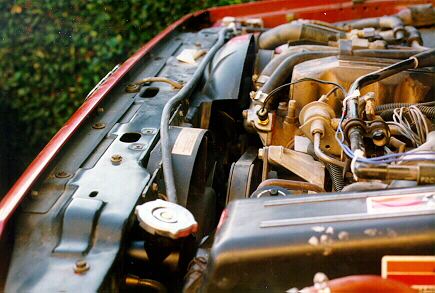
 If you have a 4.0 liter 6 Cylinder engine in your 1993 or
earlier Cherokee, you most likely still have the pressure bottle for the
radiator. There is no conventional radiator cap on the radiator, and if your
Cherokee is like mine, you must replace that pressure bottle about every 12-14
months. The bottle costs about $40.00 and the cap is $6.00. The last one I had
in mine hadn't started to crack yet, but was leaking at both hoses no matter how
tight I made the hose clamps. Most likely the combination of bigger tires, more
weight due to accessories and camping gear was too much for the original single
core radiator. I have seen one conversion to a radiator with a cap, and the
newer Cherokees have a cap on the radiator. This eliminates that pressure bottle
and adds a normal overflow bottle. I was told that they switched at about the
'94 model year, but the '96's definitely use them. The existing radiator can be
re-cored to a double or possibly a triple core, and have an elbow added to the
driver side end cap for the radiator cap. The cap should be no more then 3
inches from the radiator cap to miss hitting the air cleaner box. If you have a 4.0 liter 6 Cylinder engine in your 1993 or
earlier Cherokee, you most likely still have the pressure bottle for the
radiator. There is no conventional radiator cap on the radiator, and if your
Cherokee is like mine, you must replace that pressure bottle about every 12-14
months. The bottle costs about $40.00 and the cap is $6.00. The last one I had
in mine hadn't started to crack yet, but was leaking at both hoses no matter how
tight I made the hose clamps. Most likely the combination of bigger tires, more
weight due to accessories and camping gear was too much for the original single
core radiator. I have seen one conversion to a radiator with a cap, and the
newer Cherokees have a cap on the radiator. This eliminates that pressure bottle
and adds a normal overflow bottle. I was told that they switched at about the
'94 model year, but the '96's definitely use them. The existing radiator can be
re-cored to a double or possibly a triple core, and have an elbow added to the
driver side end cap for the radiator cap. The cap should be no more then 3
inches from the radiator cap to miss hitting the air cleaner box.
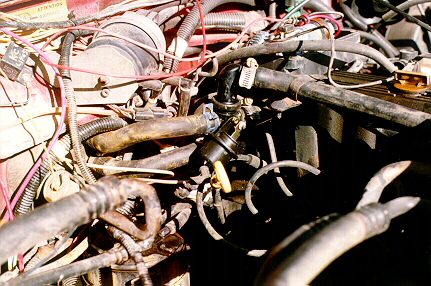 I decided to buy a Mopar Maxi Cool radiator for a '96. It came
complete with a cap and dropped in just like the original, and is a double core
radiator. I removed the air filter box for easier access to the lower hose,
automatic transmission lines and the wiring for the fan heat sensor. There are
about 18 nuts and or bolts to remove the radiator. Be careful not to lean on the
front body parts while the top cross member is removed, they will bend easily
while unsupported. There are two rubber mounts that are reused on the top of the
radiator. The hoses to the bottle will be rearranged and a '96 heater valve will
eliminate all the "T" fittings in this area. I used the hose from the
bottom of the pressure bottle to go from the top of the heater core to the top
of the heater port of the valve. About 1/2" was trimmed off the hose. The
original lower heater core hose went to the lower heater port on the valve. The
hose from the water pump goes to the port that is in line with the top heater
core hose, and the hose from the thermostat goes to the top 90 degrees port on
the heater valve. This is a little confusing in print, but see the pictures and
look at the diagram at the dealer when you buy the valve. I decided to buy a Mopar Maxi Cool radiator for a '96. It came
complete with a cap and dropped in just like the original, and is a double core
radiator. I removed the air filter box for easier access to the lower hose,
automatic transmission lines and the wiring for the fan heat sensor. There are
about 18 nuts and or bolts to remove the radiator. Be careful not to lean on the
front body parts while the top cross member is removed, they will bend easily
while unsupported. There are two rubber mounts that are reused on the top of the
radiator. The hoses to the bottle will be rearranged and a '96 heater valve will
eliminate all the "T" fittings in this area. I used the hose from the
bottom of the pressure bottle to go from the top of the heater core to the top
of the heater port of the valve. About 1/2" was trimmed off the hose. The
original lower heater core hose went to the lower heater port on the valve. The
hose from the water pump goes to the port that is in line with the top heater
core hose, and the hose from the thermostat goes to the top 90 degrees port on
the heater valve. This is a little confusing in print, but see the pictures and
look at the diagram at the dealer when you buy the valve.
 The heat switch to activate the electric fan on my '90
Cherokee screwed into the radiator just above the lower radiator hose. The
fitting for this is on the '96 radiator, but it is plugged and not threaded. The
'96 Cherokee used a heat sensor switch in the thermostat housing to turn on the
fan based on a hot engine rather than a hot radiator. The thermostat housing is
identical to my '90 except for an additional threaded lug for the '96 sensor. It
needs an electrical plug that can be purchased at an auto parts store and wired
in just like the original sensor. These two wires leading to the sensor can also
be wired to a switch on your dash if you wish to be able to run the fan
manually. This can be useful on trail runs that are slow moving with a lot of
idling. The heat switch to activate the electric fan on my '90
Cherokee screwed into the radiator just above the lower radiator hose. The
fitting for this is on the '96 radiator, but it is plugged and not threaded. The
'96 Cherokee used a heat sensor switch in the thermostat housing to turn on the
fan based on a hot engine rather than a hot radiator. The thermostat housing is
identical to my '90 except for an additional threaded lug for the '96 sensor. It
needs an electrical plug that can be purchased at an auto parts store and wired
in just like the original sensor. These two wires leading to the sensor can also
be wired to a switch on your dash if you wish to be able to run the fan
manually. This can be useful on trail runs that are slow moving with a lot of
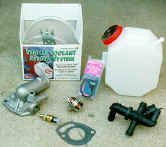
idling. 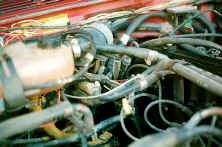 An overflow bottle must be added with the overflow tube leading to the
bottom. The hole left by removing the original bottle and its shelf gave An overflow bottle must be added with the overflow tube leading to the
bottom. The hole left by removing the original bottle and its shelf gave 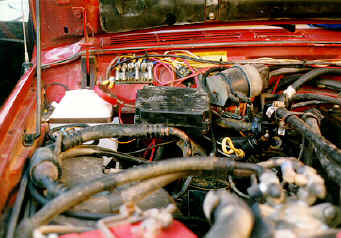 me room
for the bottle. Depending on what year Cherokee is the layout under the hood may
be different than mine. A 1-1/2-quart bottle fits easily and overflowed once, so
I bought a 2-1/2-quart bottle that had a nice wire basket to mount it. That
overflow might have just been air making its way out of the system. The
2-1/2-quart bottle has more than enough capacity and has not come close to
overflowing in moderate driving conditions. If you are going to all this trouble
and expense, be sure to replace your thermostat, coolant, and flush the engine.
The job took me about eight hours, which included remounting my RS-9000
compressor that was under the pressure bottle. Prior to this conversion, my
engine ran close to, or just inside, the red zone under any load. I didn't want
to spend $50.00 for the 3rd time in three years for another pressure
bottle. me room
for the bottle. Depending on what year Cherokee is the layout under the hood may
be different than mine. A 1-1/2-quart bottle fits easily and overflowed once, so
I bought a 2-1/2-quart bottle that had a nice wire basket to mount it. That
overflow might have just been air making its way out of the system. The
2-1/2-quart bottle has more than enough capacity and has not come close to
overflowing in moderate driving conditions. If you are going to all this trouble
and expense, be sure to replace your thermostat, coolant, and flush the engine.
The job took me about eight hours, which included remounting my RS-9000
compressor that was under the pressure bottle. Prior to this conversion, my
engine ran close to, or just inside, the red zone under any load. I didn't want
to spend $50.00 for the 3rd time in three years for another pressure
bottle.
|