Rebuild a Cherokee Neutral Start Switch
Article and Photography by Brian Pawlak
My '90 Cherokee with the 4 speed automatic began having trouble starting. When you turned the key -- nothing! When wiggling the shift lever made it start, (and with all other possibilities ruled out), I checked the neutral start switch as specified by the service manual. It indicated either an open circuit or very high resistance when it should have indicated a closed circuit. The switch can be 'clocked’ for proper adjustment, so I rotated it slightly to place the contacts in a new position. This made things better but the problem persisted. A call to the dealer for a new switch revealed the $275 price tag and, for reasons unknown, it takes 3-6 weeks for delivery. Not having the bucks for a new switch I asked the service department for advice. They told me I could open the switch, clean it and lube with dielectric grease, and "it would last a while longer." This is how I did the job.
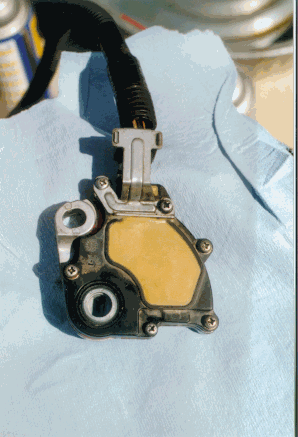
Remove the switch by prying up the washer tabs from the 7/8" attaching nut, remove the nut and the small adjusting bolt. The service manual says to remove the shift linkage from the left side of the transmission, don’t -- it’s not necessary. Slide the switch off the shaft, unplug the connector up by the trans. dip stick, and snip any zip ties. The shaft may be dirty making it hard to remove, just keep on wiggling the switch and it will come off.
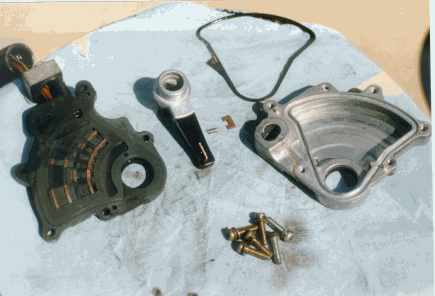
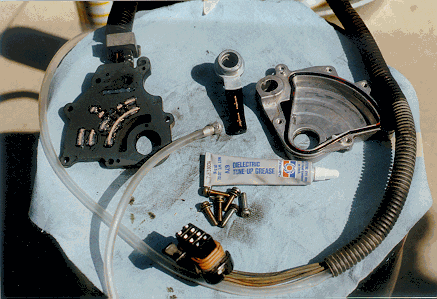
Remove six Phillips screws to open the switch, be careful of the gasket which may be brittle. The switch will most likely be sticky, dirty and corroded. The two copper contacts in the swing arm on mine were stuck in place. The springs could not push the contacts into good contact with the copper rails. Remove the contacts and springs. Clean the slots in the swing arm along with the springs and the contacts. Spray type contact cleaner works well. File or sand the top of the contacts to remove worn spots, and slightly round the as shown in fig. 1. The contacts should stick up about one tenth of an inch. If they don’t stick up out of the arm, you could get new springs at an electronics supply house. Lightly lubricate the springs and contacts with dielectric grease to prevent corrosion.
Thoroughly clean all the old grease from the pockets around the copper rails in the plastic body. The entire surface of the plastic body and copper rails were sanded flat with 240 grit aluminum oxide sandpaper. Be sure it is FLAT! I placed the sandpaper on a drill press table and slid the switch back and forth slowly on the paper. About 15 strokes removed all corrosion and low spots from the copper rails. Deburr the edges of the copper rails after sanding, -- loose copper particles in the switch will cause problems if left inside.
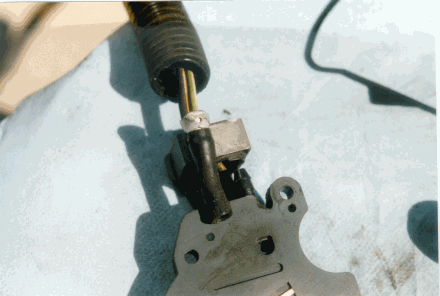
This is a great time to prevent water from getting into the switch. The vent is no more than a 1" long tube with a vent cap placed in the wire loom. The loom is open on the bottom, and mine was broken from its retainer. Water could easily enter here and corrode switch contacts, and gum up the switch. I replaced the 1" tube with a 24" tube that was routed through the wire loom and capped off with the original vent cap at the firewall high in the engine compartment.
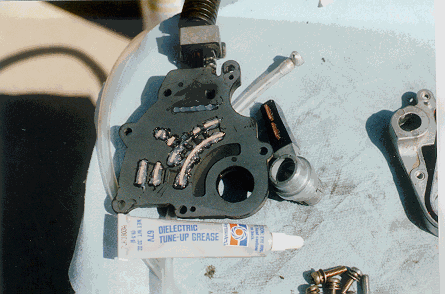
Use dielectric grease to fill the pockets around the copper rails, and to lube and protect the rails from corrosion, (As long as these pockets are present below the rails, the sliding contacts can create continuity with good springs behind them). Fill the groove near the vent -- but keep the vent clear of grease. Also lube the seals in the switch body and cover where the swing arm pivots. Don’t forget to lube the inside of the metal cover where two lugs on the back of the swing arm slide. Just prior to assembly the groove in the metal case was given a light coat of silicone sealer and the gasket was put in place. A light coat of silicone was also placed at the mating surface of the metal case outside the gasket, since the gasket was rather flat and probably would not seal properly by itself. Assemble and tighten the six screws.
Install the switch being sure to line up the vertical flats of the transmission shaft parallel with the scribed line on the switch case with the transmission in neutral. Tighten the adjustment bolt, snug the 7/8" bolt and bend washer tabs down. The connector terminals labeled 'B’ and 'C’ should have continuity in park and neutral, 'A’ and 'E’ in reverse, 'A’ and 'G’ in 3rd, and 'A’ and 'H’ in the 1st-2nd position.
It took about two hours start to finish, with time to take notes and snap a few pictures. The switch worked for 107,000 miles before it failed, and has worked flawlessly since the rebuild, (3 weeks so far). The total cost for contact cleaner and dielectric grease was $9.06 at the local parts store. With the other option being $275 at the dealer with a 3-6 week wait, I feel it was well worth it.

